What is Google Consent Mode V2?
Google Consent Mode V2 offers a sophisticated method to manage user consents for cookies and data collection, this method uses conversion modeling, leveraging Google’s AI to address gaps in conversion data resulting from user cookie rejections. Modeled conversions are derived from data that doesn’t depend on identifiable signals. Instead, it incorporates information such as device type, conversion types, country, time of day, or browser types to simulate the behavior of users who decline analytics cookies. This modeling is based on the actions of comparable users who accept analytics cookies. The goal is to provide your business with extra insights, enhancing reporting, attribution, and bidding strategies.
Consent Mode V2 is needed to leverage the modeling under the new guidelines, and when not used can cause substantial data loss after March 2024. The main difference is the addition of new consent states:
- ad_user_data is used to determine whether the user gives consent for Google’s advertising purposes.
- ad_personalization controls whether data can be used for ads personalization (e.g. for remarketing).
How to implement Google Consent Mode V2?
Integrating Google Consent Mode V2 can be straightforward. By using Complianz, or in combination with GTM4WP, the implementation process is mostly automatic. This seamless integration simplifies compliance, allowing you to focus on what’s important – your users and your content.
Before You Start:
- Remove Custom Scripts: Please delete any Google scripts or Google Tag Manager scripts you’ve added manually. Instead, add them through the Complianz plugin for a smoother experience.
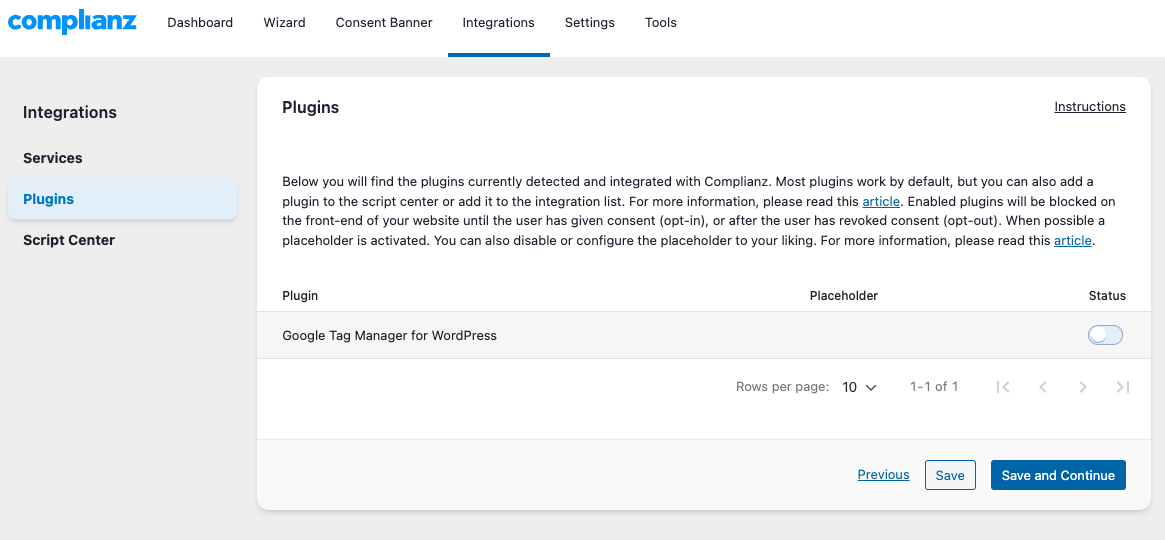
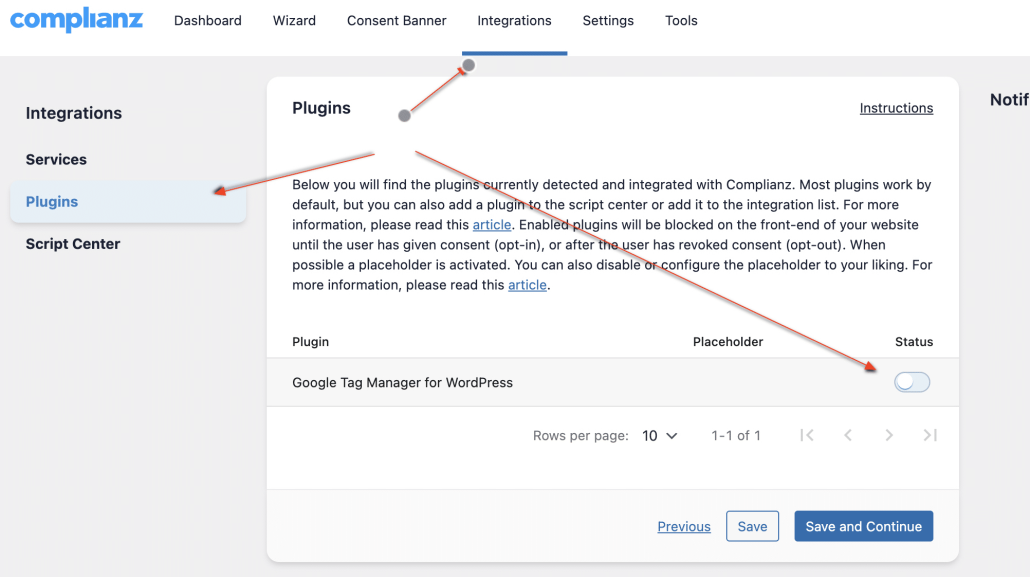
- Adjust Plugin Settings: If you’re using the GTM4WP plugin, add the Google Tag Manager snippet via Complianz and disable the GTM container in the GTM4WP plugin settings. Also, make sure to disable all integrations with such plugins in the Complianz → Integrations → Plugins section (see image).
Possible configurations for Consent Mode
Let’s Dive Into the Setup Scenarios:
Scenario 1: Using Google Tag Manager
For those who use Google Tag Manager (GTM) to inject various scripts onto their websites.
Let’s suppose that you are working with a Google tag and an unspecified custom HTML tag within GTM.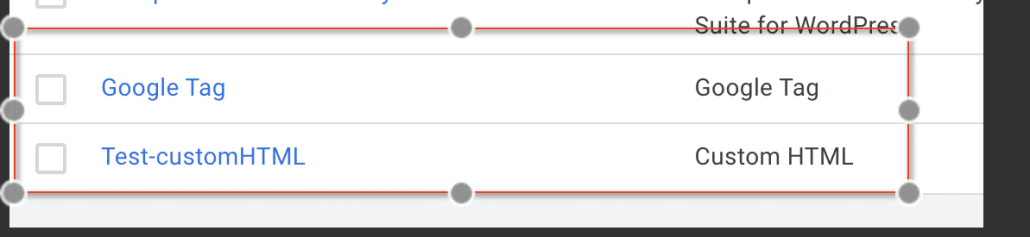
First Step: After ensuring the “Before You Start” steps are completed, head over to Wizard → Consent → “Statistics” in ComplianZ and select “Yes, and Google Tag Manager fires this script“.
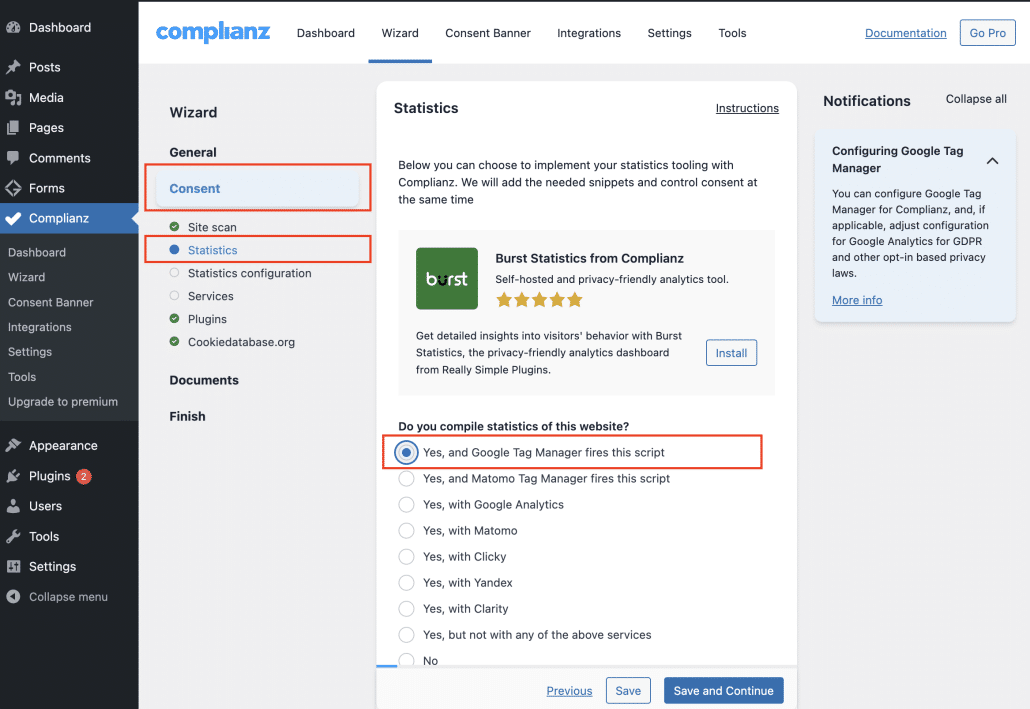
Click Save and Continue, you will reach the Statistics Configuration page.
Second Step: On the Statistics Configuration page, add your Google Tag Manager container ID and select “Yes” to the question “Will you be using our Tag Manager template?”
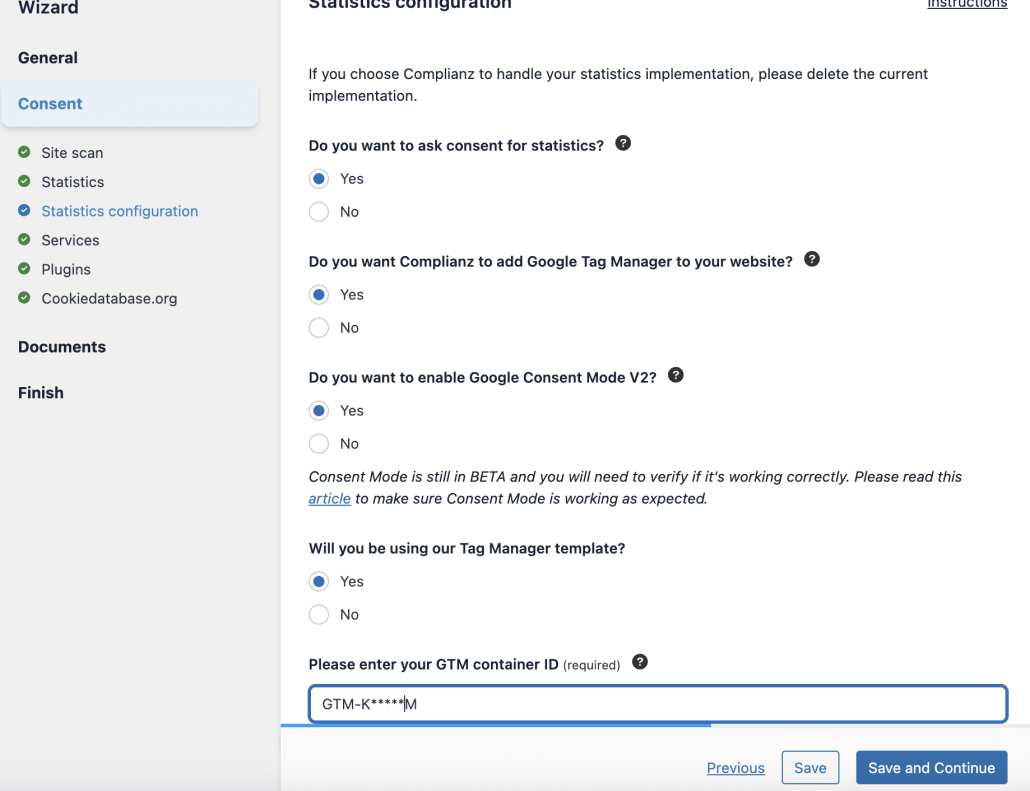
Note: You might want to enable the option “Do you want to force the script in the header?” if you need to explicitly place the GTM code in the head. However, be aware that forcing this script in the header might break configurations and integrations with other plugins.
Once you’ve completed these steps, your configuration within our plugin is all set. Next, set up Google Tag Manager (GTM) to ensure it operates seamlessly with our Consent Mode V2 configuration.
Configuring Google Tag Manager:
Step 1: Install the ComplianZ Template from the Template Gallery
- Log in to your Google Tag Manager account and go to your website’s container.
- In your Google Tag Manager dashboard, go to the “Tags” section and click on the “New” button to create a new tag.
- Access the Community Template Gallery: Within the tag creation workflow, find and click on the “Tag Configuration” box. Select “Discover more tag types in the community template gallery” at the bottom of the list.
- Use the search function in the gallery to find the ComplianZ template. Type “ComplianZ” into the search bar, once you see the ComplianZ template, click on it and select “Add to workspace” to add it to your GTM container.
- After installation, you’ll be directed to configure the new ComplianZ tag. A page labeled “Default Consent State” will appear. You do not need to modify the default settings. These are pre-configured to align with Consent Mode V2 requirements, facilitating a seamless integration. Simply proceed with the defaults.
- To ensure this tag operates correctly across your site, assign the “Consent Initialization – All Pages” trigger to it. This action ensures the tag fires on every page, effectively managing consent state initialization site-wide.
The final result should be:
Step 2: Configure Google Tags for Advanced Consent Mode
To work with the Advanced Consent Mode of the Google Consent Mode, you don’t need to apply real prior-blocking to these tags before obtaining user consent.
To set up your Google tags correctly, you only need to add the “All Pages” Trigger to your Google tags. The rest is handled by the Google Consent Mode since Google tags are compatible natively with the GCM purposes (built-in consent checks).
By using the “All Pages” trigger, Google tags will automatically load when a page opens. They will then adapt their behavior based on the consent signals received from Google Consent Mode.
Note: For detailed information about how specific Google products respond to Consent Mode signals, please consult Google Support.
So this is an example of a Google tag. Please apply only the All Pages triggers:

Step 3: Set up of Custom HTML tags or other products like Facebook Pixel (Non-Google Products)
For tags unrelated to Google, such as Facebook Pixel, which do not natively support Google Consent Mode, you need to manually manage their activation based on user consent:
In this case you should apply prior blocking to ensure these tags activate only after obtaining the necessary user consent by adding the activation trigger related to the purpose you want to apply. This means the tag will wait and not collect any data until it gets permission.
In Tag Manager, apply custom events provided by ComplianZ to manage when these tags should activate:
- Functional Consent: Tags that are necessary for website operation.
- Preferences Consent: For tags that manage user preferences.
- Statistics Consent: To gather analytics data.
- Marketing Consent: For marketing and advertising purposes.
The above categories are translated to “custom events” that can be used in Tag Manager, to specify when to trigger your tags.
- Functional (default) = cmplz_event_functional
- Preferences (variable) = cmplz_event_preferences
- Statistics (non-default) = cmplz_event_statistics
- Marketing (default) = cmplz_event_marketing.
Here’s how it should appear:![]()
For a detailed explanation, visit our comprehensive guide: Definitive Guide to Tag Manager and Complianz.
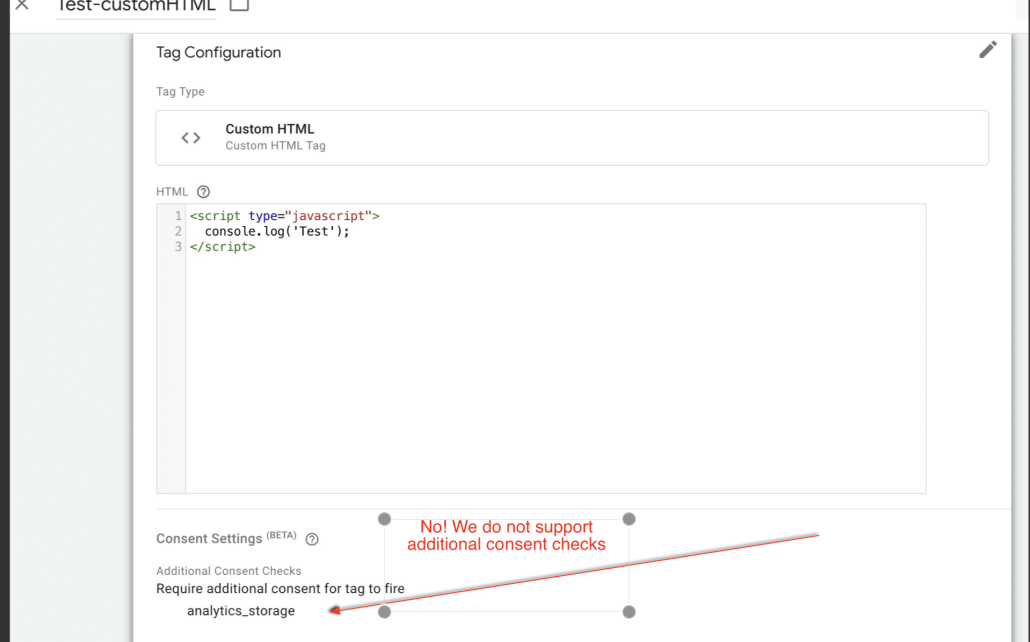
Please be aware that we do not support “additional consent checks,” and such tags should not have a Google consent mode purpose assigned. As mentioned previously, you should depend solely on our custom activation triggers for these scenarios.
Example:
GTM4WP Procedure Note:
For those already using GTM4WP, follow these steps to guarantee at least basic compatibility with the Complianz plugin. It’s important to integrate Google Tag Manager (GTM) through Complianz for proper functionality (so the previous steps of the first scenario should be followed):
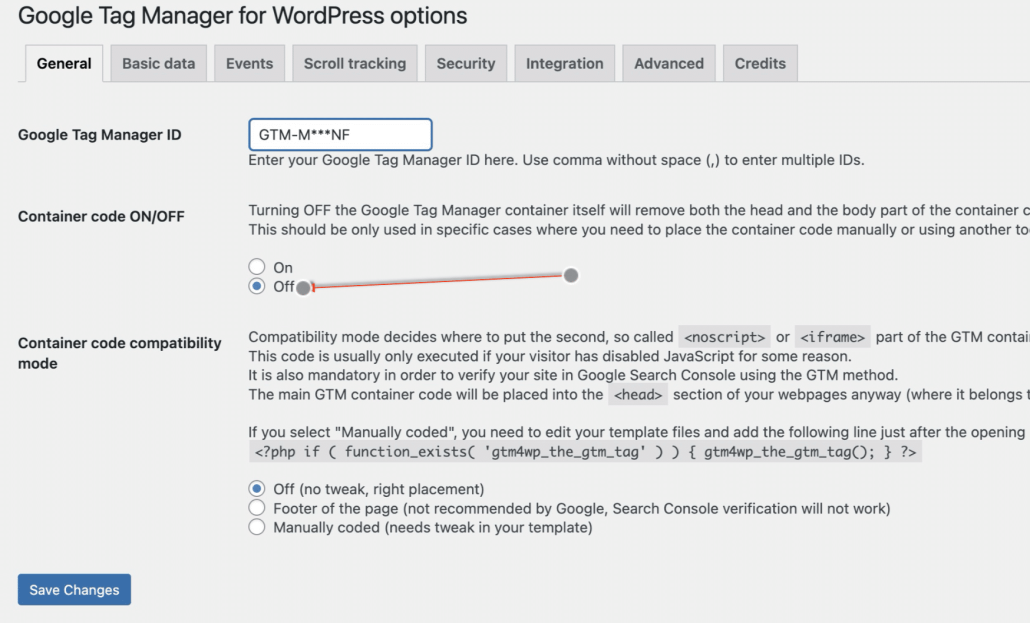
- Set OFF the GTM4WP Container: Go to the GTM4WP plugin settings and set the container to OFF. This action ensures the GTM snippet is managed through Complianz, avoiding duplication or conflicts.
- Disable GTM4WP in Complianz: Go to the ComplianZ plugin, select Integrations → Plugins, and turn off the GTM4WP integration status. This prevents GTM4WP from being blocked on the website, allowing your Google tags to operate in advanced mode.
To verify everything is set up correctly, please see the section ? How to check if Google Consent Mode is working properly
Scenario 2: Adding Google Tags Separately (NO Google Tag Manager)
In this scenario, instead of using Google Tag Manager, you directly embed separate Google scripts (like Google Analytics, Google Ads, etc.), each with its own ID.
Here’s how to do it through the ComplianZ Plugin:
Go to Complianz → Wizard → Consent → Statistics, and select “Yes, with Google Analytics”.
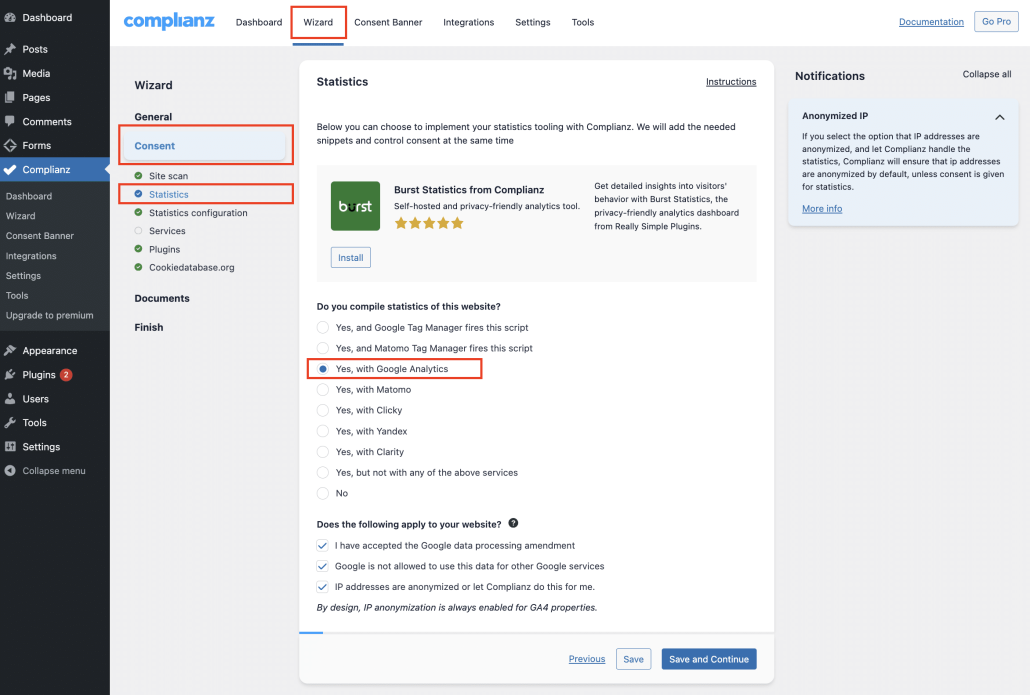
After click Save and Continue, you’ll reach the Statistics Configuration section. When asked whether to block all Google tags before consent, we recommend selecting “No”. This allows Google tags to interpret the Google Consent Mode signal and adjust their behavior accordingly, a feature known as “Advanced mode.”
The expected behaviour in this case is that the Google script is loaded before consent has been given, but the cookies are fired only after consent has been given.
How to check if Google Consent Mode is working properly
To check if everything’s set correctly:
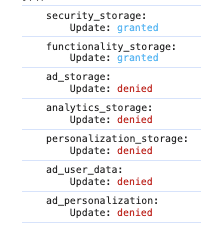
Visit your site in incognito mode and do not give consent in the Cookie Banner yet, and then place this JavaScript code in your browser’s console to check consent states.
You will see that only security_storage and functionality_storage are set to granted.
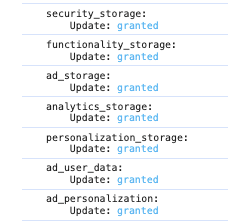
Return to your site and click Accept All in the banner, and once again enter the code in your console. Now you will see that everything has become “granted”.
That’s it. We hope you have given a good overview for the set up of the google consent mode with our plugin.
Note: For users working with Google Site Kit, we now provide a detailed guide for seamless integration: A Complete Guide to Install Site Kit and Configure Google Consent Mode with Complianz. This guide helps address potential conflicts, setup challenges, and best practices for Site Kit users. We are also exploring detailed guidance for other plugins like MonsterInsights and Google Analytics for WooCommerce—stay tuned for updates!
To avoid common issues like code duplication, which can affect consent tracking and data accuracy, consider the following general steps:
- Disable Specific Plugin Integrations: Access the ComplianZ dashboard, navigate to Integrations → Plugins, and disable the specific plugin (e.g., MonsterInsights, Google Analytics for WooCommerce, or Sitekit). This step helps prevent conflicts between ComplianZ’s consent handling and the plugin’s mechanisms.
- Check for Duplicate Implementations: Ensure there are no duplicate Consent States or Google script snippets on your website. Such duplications, often introduced by third-party plugins, can cause issues in functionality.
FAQs about Google Consent Mode with ComplianZ
Should I Block Google Tags Before Consent?
Default Setting: By default, the setting “Do you want to block all Google Tags before consent?” is set to “No”, or configured in Advanced Mode. This means Google Tags are activated upon page load and adapt their tracking mechanism based on the consent states. For example, a Google Tag may operate using parameters only, without deploying cookies, yet still connect to Google servers.
Blocking Before Consent: If you choose to block Google Tags before receiving consent, Consent Mode will activate only after consent is granted. This approach is considered the non-hybrid or ‘basic’ model of Consent Mode.
What is URL Passthrough?
URL passthrough occurs when a user clicks on an ad and lands on your website, carrying information about the ad as a query parameter in your landing page URLs. This data is typically stored in first-party cookies on your domain to enhance conversion accuracy.
When ad_storage is denied: If consent for ad_storage is not granted, this ad information will not be stored locally on the user’s device, affecting the ability to track conversions through this method.
What is Ads Data Redaction?
Ads data redaction comes into play when ads_data_redaction is enabled and ad_storage consent is denied. In such cases, identifiers for ad clicks sent in network requests by Google Ads and Floodlight tags will be redacted, meaning that specific data points are removed. Additionally, network requests are sent through a domain that does not use cookies.
How Do I Add Google Tags for Consent Mode?
To enable Consent Mode, you must use at least one Google Tag, selected under Wizard → Consent → Statistics within the Complianz plugin. You can add other tags as well, which are categorized under Statistics and Marketing.
Why does Google Tag Manager say my tag is “not placed correctly” or “too low in the page”?
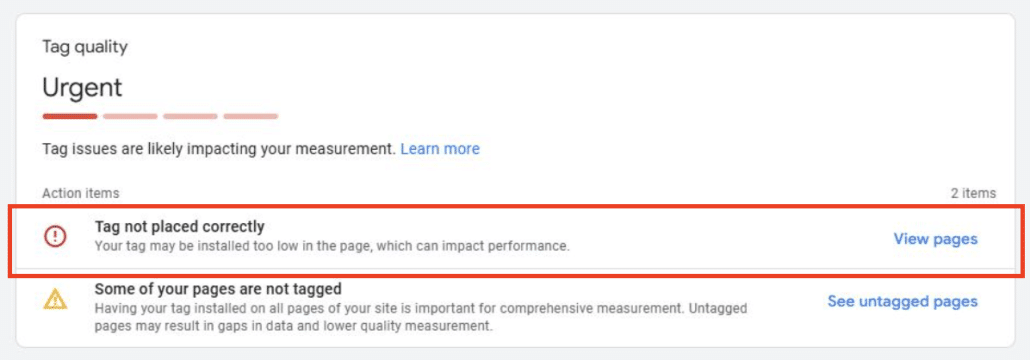
We are aware that some of our clients are being notified by GTM that the tag itself is placed too low. This is not the actual issue. We are a Google certified partner and have developed our Consent Mode v2 feature in collaboration with them.
That said, we have recently released a feature in the Statistics Configuration menu allowing you to force the GTM.js script placed by Complianz to be placed in the <head>. This does work successfully, but like other plugins placing your GTM.js script for you, the error in GTM might persist.
If your Consent Mode v2 setup was done properly, there is no actual danger of that notification impacting the results you get from using Google’s services like Google Analytics or Google Ads.