- Go to your WordPress Admin Dashboard.
- Navigate to Plugins > Add New.
- Search for Google Site Kit in the plugin repository.
- Click Install Now, then Activate.
- Follow the on-screen instructions to connect your Google account and set up the plugin.
Step 1: Set Up Google Tag Manager
Before diving into Consent Mode, you need to ensure that Site Kit and Google Tag Manager (GTM) are properly connected. ❗️ If you’ve already set up GTM with Site Kit, you can skip this step (Jump to: Enable Consent Mode in Google Site Kit). If not, follow these instructions:1.1 Set Up Google Tag Manager in Google Site Kit
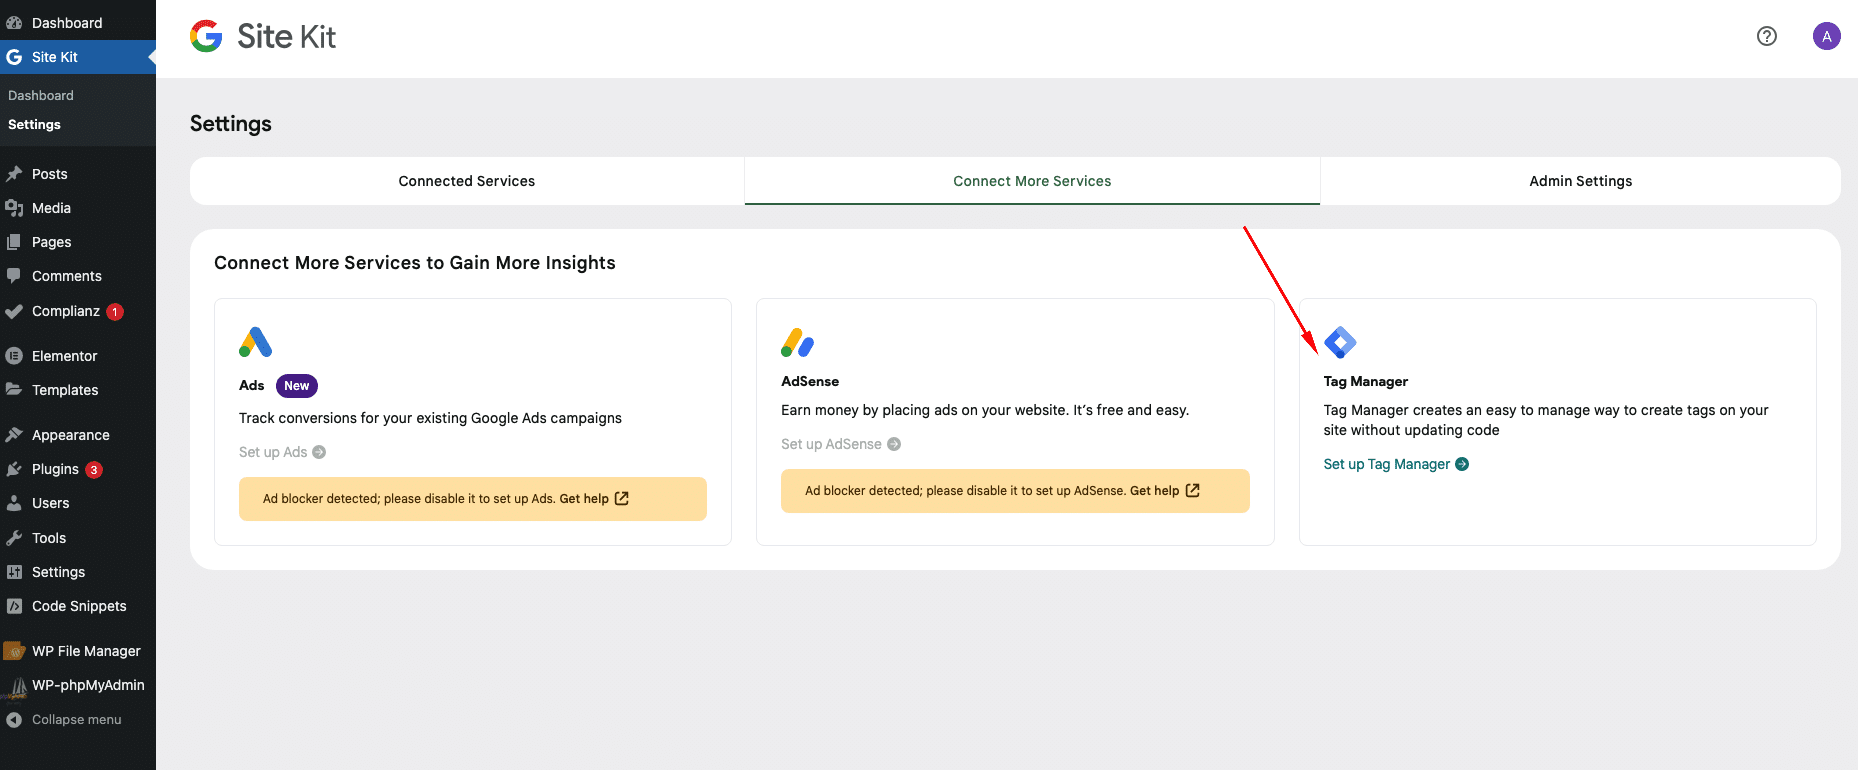
- In your WordPress dashboard, go to Google Site Kit > Settings.
- Click on Connect More Services.
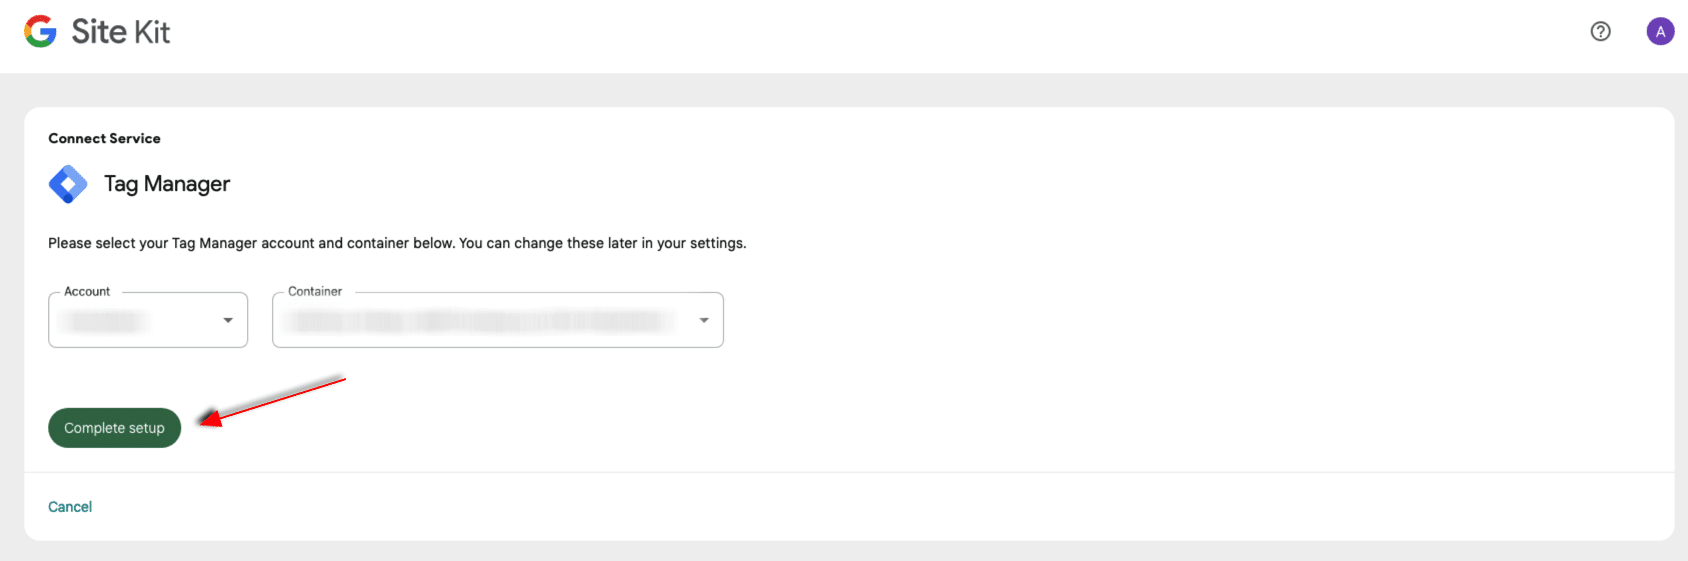
- Under the Tag Manager section, click on Set up Tag Manager and select your GTM container.
- Click Complete setup to finalize the connection.
1.2 Enable Consent Mode in Google Site Kit
- Next, navigate to Google Site Kit > Settings > Admin Settings.
- Toggle on the Consent Mode option to enable it.

Step 2: Configure Google Tag Manager with the Complianz Template
Now that Site Kit and Consent Mode are integrated and enabled, you need to configure GTM to work with Complianz. This allows Complianz to manage the consent states properly.
2.1 Install the Complianz Template
- Log in to your Google Tag Manager account and open your website’s container.
- In the GTM dashboard, go to the Tags section and click New to create a new tag.
- Click on the Tag Configuration box and select Discover more tag types in the community template gallery.
- In the gallery, use the search bar to find the Complianz template.
- Once you find it, click on Add to workspace to install it.
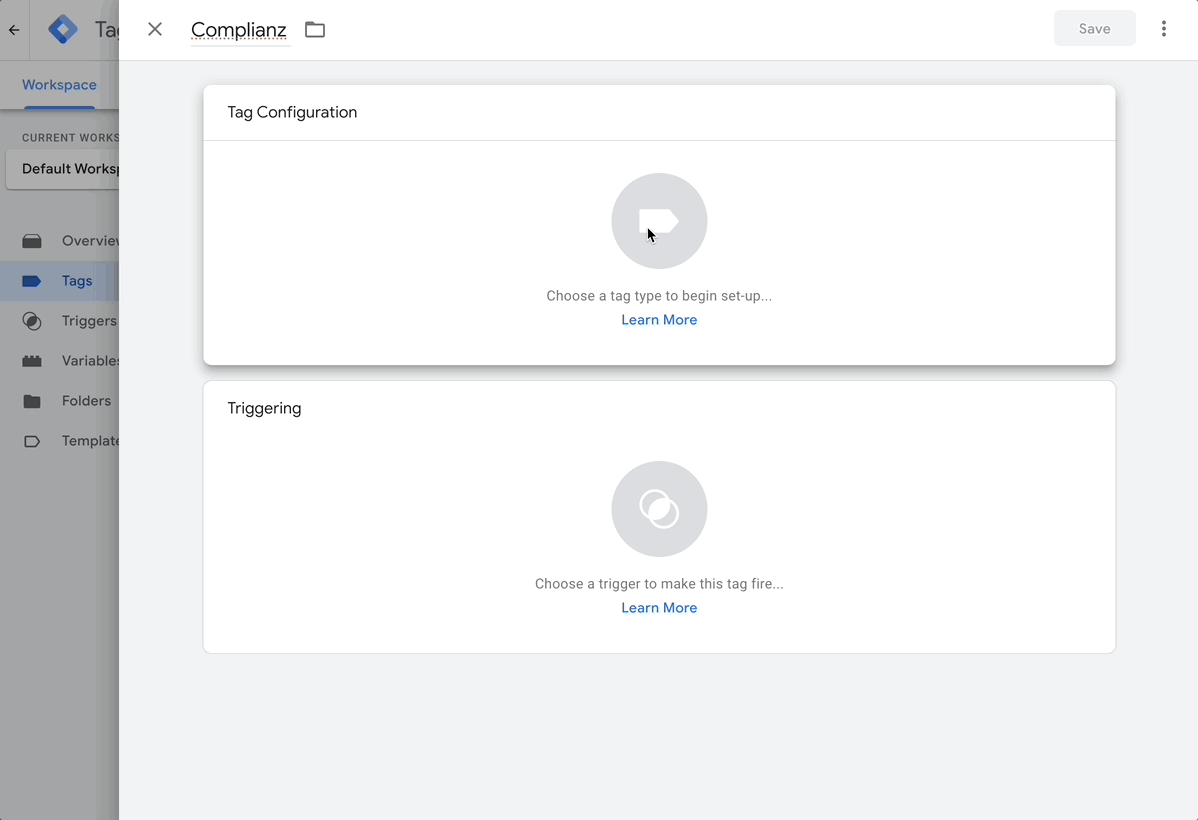
2.2 Configure the Complianz Tag
- After installing the template, you’ll be directed to configure the new Complianz tag. The Default Consent State page will appear. Leave the settings as they are, since they are pre-configured to align with Consent Mode V2.
- Assign the Consent Initialization – All Pages trigger to ensure the tag fires on every page load.
This setup helps you manage consent states across your entire site automatically.
The final result will be:

2.3 Configure Google Tags for Advanced Consent Mode
To work with the Advanced Consent Mode of the Google Consent Mode, you don’t need to apply real prior-blocking to these tags before obtaining user consent.
To set up your Google tags correctly, you only need to add the “All Pages” Trigger to your Google tags. The rest is handled by the Google Consent Mode since Google tags are compatible natively with the GCM purposes (built-in consent checks).
By using the “All Pages” trigger, Google tags will automatically load when a page opens. They will then adapt their behavior based on the consent signals received from Google Consent Mode.
Note: For detailed information about how specific Google products respond to Consent Mode signals, please consult Google Support.
So this is an example of a Google tag. Please apply only the All Pages triggers:

Step 3: Configure Complianz Settings for Google Consent Mode
Now that Site Kit and GTM are set up, you need to configure Complianz to properly handle user consent for analytics and marketing purposes.
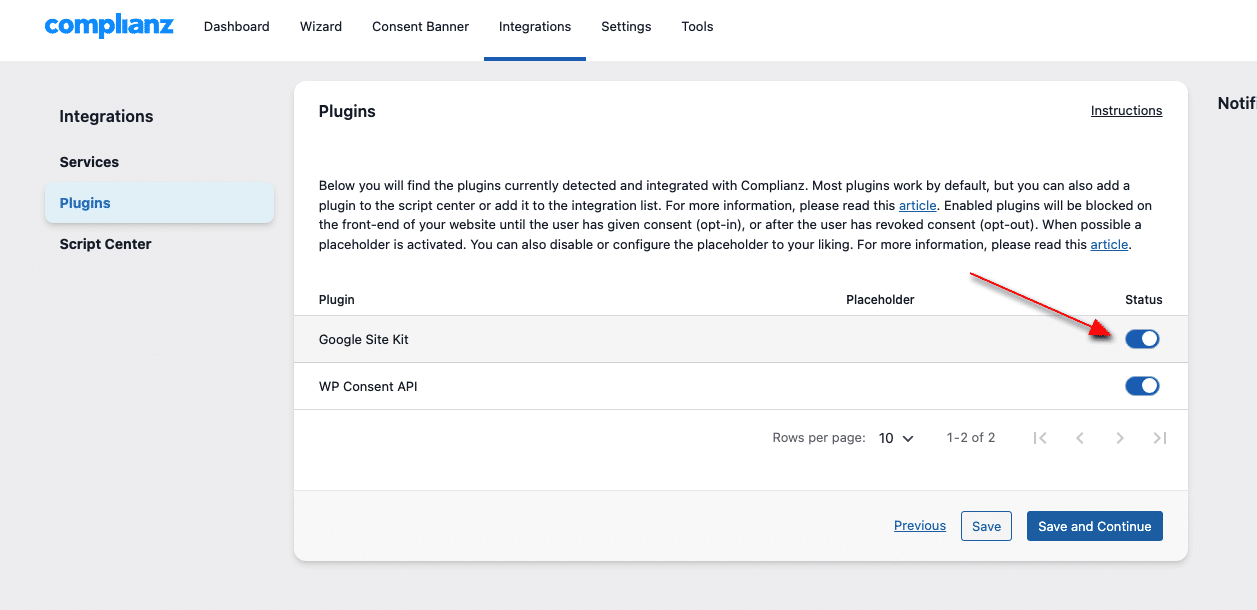
3.1 Enable Google Site Kit Integration in Complianz
- Once Site Kit is installed, Complianz will automatically detect it.
- Go to the Complianz Dashboard > Integrations > Plugins.
- Ensure that the Google Site Kit integration is enabled. If not, toggle it on and click Save.
3.2 Set Up Google Tag Manager for Analytics
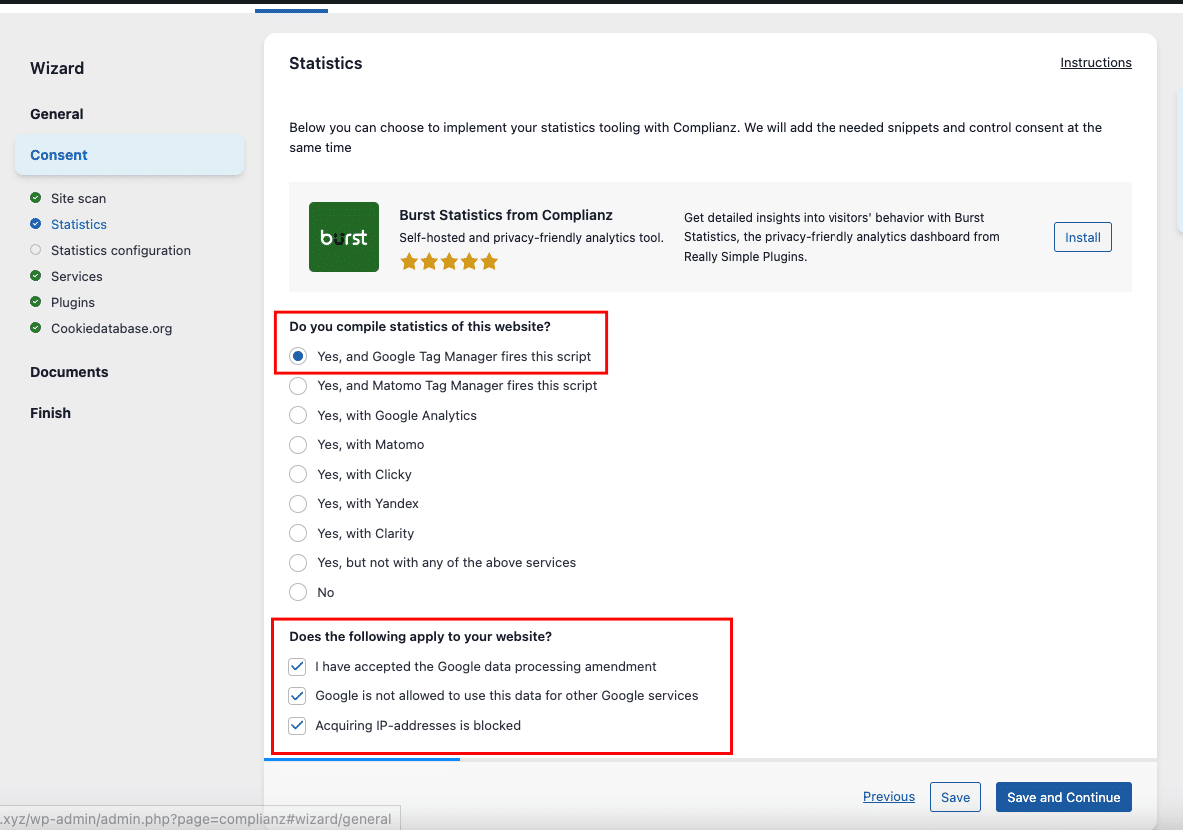
- Go to Wizard > Consent > Statistics.
- Set the option for “Do you compile statistics of this website?” to Yes. This will make sure that Google Tag Manager is triggered to load the correct script for collecting analytics data.
- Under “Does the following apply to your website?”, check any relevant boxes on your specific setup, and click Save and Continue. (Note: Most standard configurations will need these options enabled).
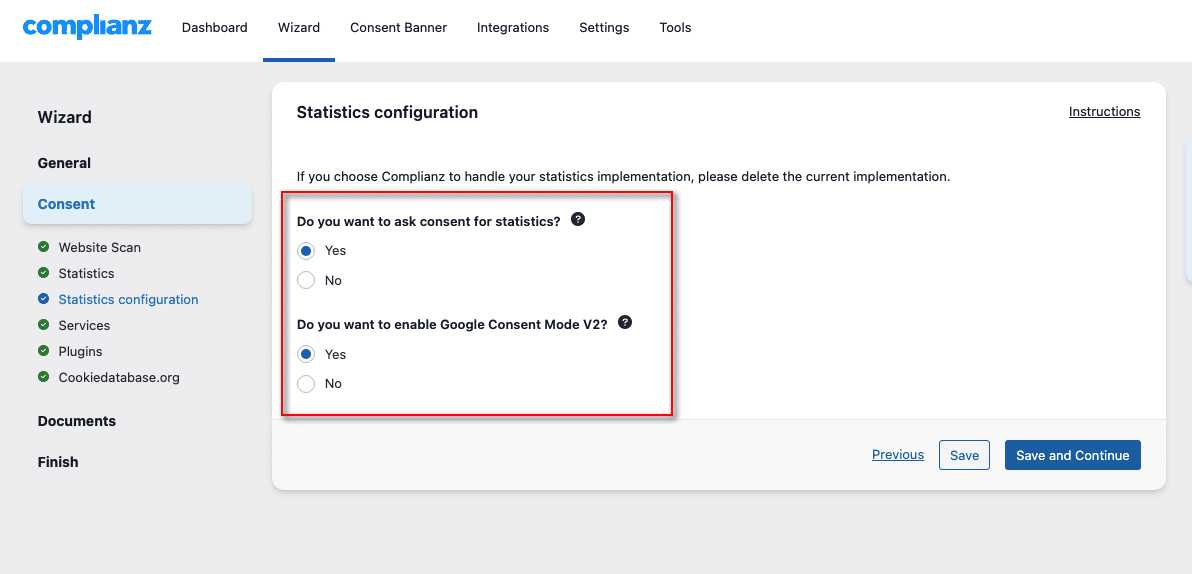
3.3 Configure the Statistics Section
- In the Statistics Configuration section, answer the following:
- Do you want to ask consent for statistics? YES
- Do you want to enable Google Consent Mode V2? YES
- Once these options are configured, click Save and then click Finish to complete the wizard.
Step 4: Verifying Google Consent Mode
After setting everything up, it’s crucial to verify that Google Consent Mode is working correctly.
- Open your site in Incognito Mode and do not accept the cookie consent banner.
- Open the browser console (right-click on the page and select Inspect, then go to the Console tab).
- Paste the following JavaScript code into the console:
(() => {
  l = s => s == undefined ? "" : s ? "granted" : "denied";
  c = s => s == "granted" ? "color: #29b6f6": "color: #C00";

  if (!"google_tag_data" in window) {
    console.log("No Consent Mode data found, please check your Complianz settings.");
    return;
  }

  var g = google_tag_data.ics.entries, i = "", t = "", u = "";

  for (var a in g) {
    i = l(g[a]['initial']);
    u = l(g[a]['update']);
    if (i == "" && u == "") continue;
    t = ("\t" + a + ":" +
      (i != "" ? "\n\t\tDefault: %c" + i : "%c") + "%c" +
      (u != "" ? "\n\t\tUpdate: %c" + u : "%c"));
    console.log(t, i != "" ? c(i) : "", "", u != "" ? c(u) : "", "");
  }

  if (i == "") console.log("");
})();
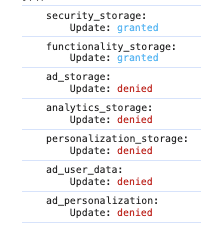
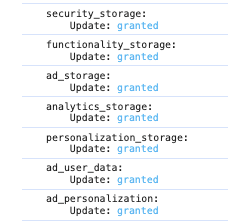
- You should see that only security_storage and functionality_storage are marked as granted.

- Now, return to your website and click Accept All in the cookie banner. Re-enter the console and run the same code again.
This time, you should see all consent categories marked as granted.
Step 5: Avoiding Common Issues
When setting up Consent Mode with Complianz, some common issues can arise, especially with duplicate code or conflicting implementations. Here are a few tips to avoid problems:
- Check for Duplicate Implementations: Ensure there are no duplicate Consent States or Google script snippets on your website. Such duplications, often introduced by third-party plugins, can cause issues in functionality.
That’s it! You’ve successfully installed Google Site Kit, enabled Google Consent Mode, and configured Complianz to manage user consent for your website. This setup will ensure compliance with privacy laws, provide a smooth user experience, and give you control over how data is collected and processed.
FAQs about Google Consent Mode with Complianz
Should I Block Google Tags Before Consent?
Default Setting: By default, the setting “Do you want to block all Google Tags before consent?” is set to “No”, or configured in Advanced Mode. This means Google Tags are activated upon page load and adapt their tracking mechanism based on the consent states. For example, a Google Tag may operate using parameters only, without deploying cookies, yet still connect to Google servers.
Blocking Before Consent: If you choose to block Google Tags before receiving consent, Consent Mode will activate only after consent is granted. This approach is considered the non-hybrid or ‘basic’ model of Consent Mode.
What is URL Passthrough?
URL passthrough occurs when a user clicks on an ad and lands on your website, carrying information about the ad as a query parameter in your landing page URLs. This data is typically stored in first-party cookies on your domain to enhance conversion accuracy.
When ad_storage is denied: If consent for ad_storage is not granted, this ad information will not be stored locally on the user’s device, affecting the ability to track conversions through this method.
What is Ads Data Redaction?
Ads data redaction comes into play when ads_data_redaction is enabled and ad_storage consent is denied. In such cases, identifiers for ad clicks sent in network requests by Google Ads and Floodlight tags will be redacted, meaning that specific data points are removed. Additionally, network requests are sent through a domain that does not use cookies.
How Do I Add Google Tags for Consent Mode?
To enable Consent Mode, you must use at least one Google Tag, selected under Wizard → Consent → Statistics within the Complianz plugin. You can add other tags as well, which are categorized under Statistics and Marketing.